Microsoft Windows Vista and Windows 7 has a Windows Search Indexing service installed and enabled that allows the operating system to search certain places quickly finding files or programs in a flash. In order to search certain locations on your computer quickly the Windows Search indexing service indexes the contents of each location in advance and stores them in memory to speed up it’s search. This can take up a lot of memory and resources and will certainly affect your computers performance. It might even be indexing locations that you never even intend to search for files on. This is why you need to either disable theWindows Search indexing service or modify its process to do minimal work.

Of course you do not need to alter any settings for the Windows Search indexing service if you have not recognized any performance problems on your computer. However if you want to speed up your computer, this is just one of the tasks you can do.

How to disable the Windows Search Indexing completely for all locations:


  1. Go to the Start Menu.
  2. Type services.msc in the search box. As you are typing you will see items appear in the menu. This is because it is being indexed and can be searched quickly.
  3. Scroll-down to find the Indexing Service which is called Windows search and double-click it.
Picture
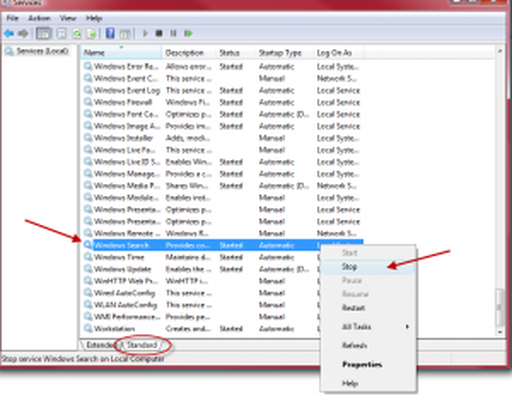
4.  Press on  the Stop button to Stop the indexing service.
Picture
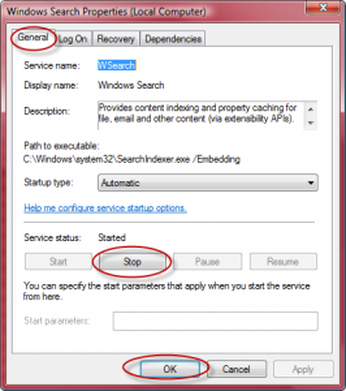
5.  Under Startup type press on the drop down arrow to see choices.
Picture
6.  Choose Disabled.

After disabling and turning off the Windows Indexing Service, you will still be able to use the Windows search but it will work more slowly than with the indexing enabled.


This tool is a great download for anyone who wants to quickly resize their photos to send or upload to the web. The instructions below will show you how to download this tool for your windows 7 & vista computer.

Download Instructions

Click on this link: http://imageresizer.codeplex.com/releases/view/51338#DownloadId=152077

Under the Downloads heading click on the option best suited to your computer, 32 bit or 64 bit
Once you have selected your download the agreement below will display, click on I Agree.
Picture
The Run dialog box will open click on Run
Picture
the dialog box below will display this is saving the executable file to the computer. When finished click open
Picture
To run the executable file click on Run
Picture
The Install wizard will open, Tick the I accept box and click Install
Picture
The installer progress bar will display below
Picture
Click on Finish
Picture
You have now Downloaded the power resizer tool

How to use the tool?

Find your picture you want to resize
Right click on the picture and click on Resize Picture
Picture
The option box below will display, choose the size you want and click ok
Picture
The progress bar will appear
Picture
Below is how the resized image will appear, notice how it has "Small" in the file name.
Picture

 
The General Shortcuts We’ll kickoff the list with some really general shortcuts that you often used.

  • CTRL+C (Copy)
  • CTRL+X (Cut)
  • CTRL+V (Paste)
  • CTRL+Z (Undo)
  • DELETE (Delete)
  • SHIFT+DELETE (Delete the selected item permanently without placing the item in the Recycle Bin)
  • CTRL while dragging an item (Copy the selected item)
  • CTRL+SHIFT while dragging an item (Create a shortcut to the selected item)
  • F2 key (Rename the selected item)
  • CTRL+RIGHT ARROW (Move the insertion point to the beginning of the next word)
  • CTRL+LEFT ARROW (Move the insertion point to the beginning of the previous word)
  • CTRL+DOWN ARROW (Move the insertion point to the beginning of the next paragraph)
  • CTRL+UP ARROW (Move the insertion point to the beginning of the previous paragraph)
  • CTRL+SHIFT with any of the arrow keys (Highlight a block of text)
  • SHIFT with any of the arrow keys (Select more than one item in a window or on the desktop, or select text in a document)
  • CTRL+A (Select all)
  • F3 key (Search for a file or a folder)
  • ALT+ENTER (View the properties for the selected item)
  • ALT+F4 (Close the active item, or quit the active program)
  • ALT+ENTER (Display the properties of the selected object)
  • ALT+SPACEBAR (Open the shortcut menu for the active window)
  • CTRL+F4 (Close the active document in programs that enable you to have multiple documents open simultaneously)
  • ALT+TAB (Switch between the open items)
  • ALT+ESC (Cycle through items in the order that they had been opened)
  • F6 key (Cycle through the screen elements in a window or on the desktop)
  • F4 key (Display the Address bar list in My Computer or Windows Explorer)
  • SHIFT+F10 (Display the shortcut menu for the selected item)
  • ALT+SPACEBAR (Display the System menu for the active window)
  • CTRL+ESC (Display the Start menu)
  • ALT+Underlined letter in a menu name (Display the corresponding menu)
  • Underlined letter in a command name on an open menu (Perform the corresponding command)
  • F10 key (Activate the menu bar in the active program)
  • RIGHT ARROW (Open the next menu to the right, or open a submenu)
  • LEFT ARROW (Open the next menu to the left, or close a submenu)
  • F5 key (Update the active window)
  • BACKSPACE (View the folder one level up in My Computer or Windows Explorer)
  • ESC (Cancel the current task)
  • SHIFT when you insert a CD-ROM into the CD-ROM drive (Prevent the CD-ROM from automatically playing)


Dialog Box Keyboard Shortcuts
  • CTRL+TAB (Move forward through the tabs)
  • CTRL+SHIFT+TAB (Move backward through the tabs)
  • TAB (Move forward through the options)
  • SHIFT+TAB (Move backward through the options)
  • ALT+Underlined letter (Perform the corresponding command or select the corresponding option)
  • ENTER (Perform the command for the active option or button)
  • SPACEBAR (Select or clear the check box if the active option is a check box)
  • Arrow keys (Select a button if the active option is a group of option buttons)
  • F1 key (Display Help)
  • F4 key (Display the items in the active list)
  • BACKSPACE (Open a folder one level up if a folder is selected in the Save As or Open dialog box)
Microsoft Natural Keyboard Shortcuts
  • Windows Logo (Display or hide the Start menu)
  • Windows Logo+BREAK (Display the System Properties dialog box)
  • Windows Logo+D (Display the desktop)
  • Windows Logo+M (Minimize all of the windows)
  • Windows Logo+SHIFT+M (Restore the minimized windows)
  • Windows Logo+E (Open My Computer)
  • Windows Logo+F (Search for a file or a folder)
  • CTRL+Windows Logo+F (Search for computers)
  • Windows Logo+F1 (Display Windows Help)
  • Windows Logo+ L (Lock the keyboard)
  • Windows Logo+R (Open the Run dialog box)
  • Windows Logo+U (Open Utility Manager)
Accessibility Keyboard Shortcuts
  • Right SHIFT for eight seconds (Switch FilterKeys either on or off)
  • Left ALT+left SHIFT+PRINT SCREEN (Switch High Contrast either on or off)
  • Left ALT+left SHIFT+NUM LOCK (Switch the MouseKeys either on or off)
  • SHIFT five times (Switch the StickyKeys either on or off)
  • NUM LOCK for five seconds (Switch the ToggleKeys either on or off)
  • Windows Logo +U (Open Utility Manager)
Windows Explorer Keyboard Shortcuts
  • END (Display the bottom of the active window)
  • HOME (Display the top of the active window)
  • NUM LOCK+Asterisk sign (*) (Display all of the subfolders that are under the selected folder)
  • NUM LOCK+Plus sign (+) (Display the contents of the selected folder)
  • NUM LOCK+Minus sign (-) (Collapse the selected folder)
  • LEFT ARROW (Collapse the current selection if it is expanded, or select the parent folder)
  • RIGHT ARROW (Display the current selection if it is collapsed, or select the first subfolder)
Shortcut Keys for Character Map
  • After you double-click a character on the grid of characters, you can move through the grid by using the keyboard shortcuts:
  • RIGHT ARROW (Move to the right or to the beginning of the next line)
  • LEFT ARROW (Move to the left or to the end of the previous line)
  • UP ARROW (Move up one row)
  • DOWN ARROW (Move down one row)
  • PAGE UP (Move up one screen at a time)
  • PAGE DOWN (Move down one screen at a time)
  • HOME (Move to the beginning of the line)
  • END (Move to the end of the line)
  • CTRL+HOME (Move to the first character)
  • CTRL+END (Move to the last character)
  • SPACEBAR (Switch between Enlarged and Nor mal mode when a character is selected)
Microsoft Management Console (MMC) Main Window Keyboard Shortcuts
  • CTRL+O (Open a saved console)
  • CTRL+N (Open a new console)
  • CTRL+S (Save the open console)
  • CTRL+M (Add or remove a console item)
  • CTRL+W (Open a new window)
  • F5 key (Update the content of all console windows)
  • ALT+SPACEBAR (Display the MMC window menu)
  • ALT+F4 (Close the console)
  • ALT+A (Display the Action menu)
  • ALT+V (Display the View menu)
  • ALT+F (Display the File menu)
  • ALT+O (Display the Favorites menu)
MMC Console Window Keyboard Shortcuts
  • CTRL+P (Print the current page or active pane)
  • ALT+Minus sign (-) (Display the window menu for the active console window)
  • SHIFT+F10 (Display the Action shortcut menu for the selected item)
  • F1 key (Open the Help topic, if any, for the selected item)
  • F5 key (Update the content of all console windows)
  • CTRL+F10 (Maximize the active console window)
  • CTRL+F5 (Restore the active console window)
  • ALT+ENTER (Display the Properties dialog box, if any, for the selected item)
  • F2 key (Rename the selected item)
  • CTRL+F4 (Close the active console window. When a console has only one console window, this shortcut closes the console)
Remote Desktop Connection Navigation
  • CTRL+ALT+END (Open the m*cro$oft Windows NT Security dialog box)
  • ALT+PAGE UP (Switch between programs from left to right)
  • ALT+PAGE DOWN (Switch between programs from right to left)
  • ALT+INSERT (Cycle through the programs in most recently used order)
  • ALT+HOME (Display the Start menu)
  • CTRL+ALT+BREAK (Switch the client computer between a window and a full screen)
  • ALT+DELETE (Display the Windows menu)
  • CTRL+ALT+Minus sign (-) (Place a snapshot of the active window in the client on the Terminal server clipboard and provide the same functionality as pressingPRINT SCREEN on a local computer.)
  • CTRL+ALT+Plus sign (+) (Place a snapshot of the entire client window area on the Terminal server clipboard and provide the same functionality as pressing ALT+PRINT SCREEN on a local computer.)
Internet Explorer navigation
  • CTRL+B (Open the Organize Favorites dialog box)
  • CTRL+E (Open the Search bar)
  • CTRL+F (Start the Find utility)
  • CTRL+H (Open the History bar)
  • CTRL+I (Open the Favorites bar)
  • CTRL+L (Open the Open dialog box)
  • CTRL+N (Start another instance of the browser with the same Web address)
  • CTRL+O (Open the Open dialog box, the same as CTRL+L)
  • CTRL+P (Open the Print dialog box)
  • CTRL+R (Update the current Web page)
  • CTRL+W (Close the current window)


If you choose not to download and install an update, it’s available for you the next time you visit Windows Update…and the next time, and the time after that as well. You might have a good reason for not accepting a particular update—perhaps it makes improvements to a Windows feature you never use—and there’s no reason it should clutter your list of available updates.

To remove an item from the list without installing it, you hide it. This is a pretty easy trick, but the option for hiding updates in the list is itself somewhat hidden and often goes overlooked.

In the list of available updates, right-click any update that you don’t want to see again, and choose Hide Update. If you later change your mind—or if you just want to see a list of the updates you’ve chosen to hide—on the main Windows Update page, click Restore Hidden Updates.

Picture